As a seasoned control valve supplier, I've witnessed firsthand the critical role that I/P (current-to-pressure) converters play in optimizing the performance of control valve systems. These devices are essential for translating electrical signals into precise pneumatic pressures, enabling accurate control of valve position and flow rates. In this blog post, I'll guide you through the step-by-step process of installing an I/P converter in a control valve system, sharing valuable insights and best practices along the way.
Step 1: Gather the Necessary Tools and Materials
Before you begin the installation process, it's important to gather all the tools and materials you'll need. This includes the I/P converter itself, appropriate mounting hardware, tubing, fittings, a power supply, and any necessary electrical wiring. Make sure you have a detailed installation manual for the I/P converter, as well as a schematic diagram of the control valve system.
Step 2: Select the Mounting Location
The first step in installing an I/P converter is to select an appropriate mounting location. The converter should be installed in a clean, dry, and well-ventilated area, away from sources of heat, vibration, and moisture. It should also be easily accessible for maintenance and adjustment.
When choosing a mounting location, consider the following factors:
- Proximity to the control valve: The I/P converter should be located as close as possible to the control valve to minimize signal transmission delays and ensure accurate control.
- Accessibility: The converter should be easily accessible for maintenance and adjustment. Make sure there is enough space around the converter to allow for easy removal and replacement of components.
- Environmental conditions: The mounting location should be protected from extreme temperatures, humidity, and dust. If necessary, use a protective enclosure to shield the converter from the elements.
Step 3: Mount the I/P Converter
Once you've selected the mounting location, it's time to mount the I/P converter. Most I/P converters come with mounting brackets or flanges that can be used to attach the converter to a wall, panel, or other suitable surface. Follow the manufacturer's instructions carefully to ensure proper installation.
When mounting the converter, make sure it is level and secure. Use the appropriate mounting hardware and tighten the bolts or screws to the recommended torque specifications. Avoid over-tightening the hardware, as this can damage the converter or cause it to malfunction.
Step 4: Connect the Pneumatic Tubing
After mounting the I/P converter, the next step is to connect the pneumatic tubing. The tubing is used to supply compressed air to the converter and to transmit the pneumatic output signal to the control valve.
When connecting the tubing, make sure you use the appropriate size and type of tubing for the application. The tubing should be clean, dry, and free of any debris or contaminants. Use the appropriate fittings to connect the tubing to the converter and the control valve, and make sure the connections are tight and leak-free.
Step 5: Connect the Electrical Wiring
In addition to the pneumatic tubing, the I/P converter also requires electrical wiring to provide power and to transmit the electrical input signal. The wiring should be installed in accordance with local electrical codes and regulations, and should be properly grounded to prevent electrical interference and ensure safe operation.
When connecting the electrical wiring, make sure you use the appropriate size and type of wire for the application. The wire should be rated for the voltage and current requirements of the converter, and should be protected from damage and abrasion. Use the appropriate connectors and terminals to connect the wire to the converter and the control system, and make sure the connections are tight and secure.
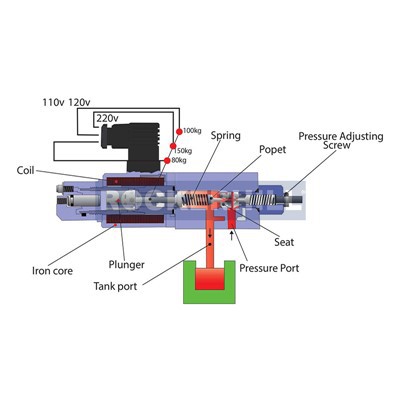
Step 6: Calibrate the I/P Converter
Once the I/P converter is installed and connected, the next step is to calibrate it. Calibration is the process of adjusting the converter to ensure that it accurately translates the electrical input signal into the desired pneumatic output pressure.
The calibration process typically involves the following steps:
- Set the zero point: The zero point is the pneumatic output pressure when the electrical input signal is zero. To set the zero point, adjust the zero adjustment screw on the converter until the pneumatic output pressure is zero.
- Set the span: The span is the range of pneumatic output pressures that the converter can produce. To set the span, apply a known electrical input signal to the converter and adjust the span adjustment screw until the pneumatic output pressure is within the desired range.
- Check the linearity: Linearity is the degree to which the pneumatic output pressure varies linearly with the electrical input signal. To check the linearity, apply a series of electrical input signals to the converter and measure the corresponding pneumatic output pressures. The output pressures should vary linearly with the input signals within the specified range.
Step 7: Test the Control Valve System
After calibrating the I/P converter, it's important to test the control valve system to ensure that it is operating properly. The test should include a series of step changes in the electrical input signal to the converter and a measurement of the corresponding changes in the pneumatic output pressure and the valve position.
During the test, monitor the performance of the control valve system and make any necessary adjustments to the I/P converter or the control valve. Pay close attention to the response time, accuracy, and stability of the system, and make sure it meets the requirements of the application.
Step 8: Perform Regular Maintenance
Once the control valve system is installed and operating properly, it's important to perform regular maintenance to ensure its continued reliability and performance. This includes inspecting the I/P converter and the control valve for signs of wear, damage, or contamination, and cleaning or replacing any components as needed.
In addition to regular inspections, it's also important to perform periodic calibration of the I/P converter to ensure that it continues to accurately translate the electrical input signal into the desired pneumatic output pressure. Follow the manufacturer's recommendations for maintenance and calibration intervals, and keep detailed records of all maintenance activities.
Conclusion
Installing an I/P converter in a control valve system is a critical step in ensuring accurate and reliable control of valve position and flow rates. By following the steps outlined in this blog post and using the appropriate tools and materials, you can install an I/P converter safely and effectively, and optimize the performance of your control valve system.
If you have any questions or need further assistance with the installation or calibration of an I/P converter, please don't hesitate to [contact us for procurement and negotiation]. Our team of experts is available to provide you with the support and guidance you need to ensure the success of your project.


References
- Manufacturer's installation manual for the I/P converter
- Control valve system schematic diagram
- Local electrical codes and regulations